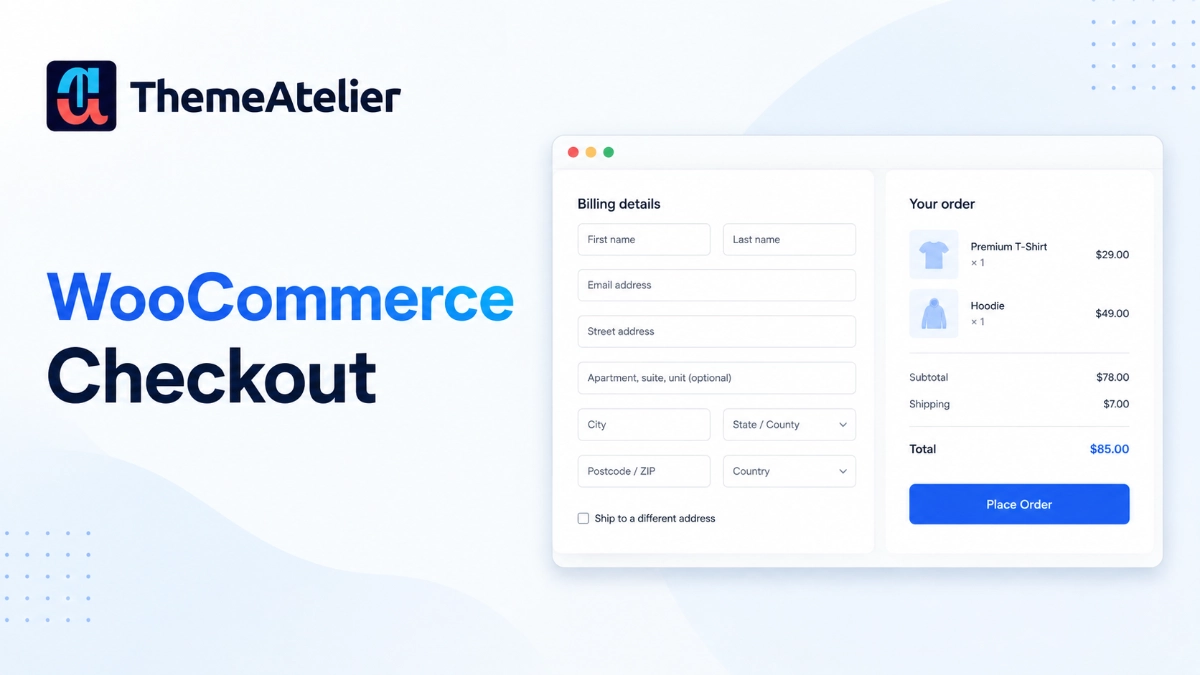

The checkout page is the finish line in generating revenue for your online business. You publish product pages, improve SEO, run marketing campaigns, fine-tune your pricing, and optimize the site speed, which may bring shoppers to the threshold. Yet the checkout experience dictates whether they cross it or walk away.
The default WooCommerce checkout is rarely optimized for modern e-commerce expectations. These generic fields often create friction, long forms intimidate mobile shoppers, and a lack of visual branding can break consumer trust at the crucial moment of purchase.
The good news is that you don’t need to be a developer to improve the checkout experience. Modern WordPress tools make it possible to redesign layouts and create a cleaner purchasing journey without touching a single line of code.
Here, you’ll learn how to customize woocommerce checkout page without coding. We’ll cover what you can change, the different approaches available, and a practical walkthrough for creating a checkout page that looks professional and helps customers complete their orders more confidently.
“If you’re still building out your store’s toolkit, it’s worth checking our roundup of the best WooCommerce plugins before picking a checkout customization tool — the right foundation makes checkout customization much easier down the line.”
Table of Contents
Why Customize WooCommerce Checkout Page?
WooCommerce provides a functional checkout page out of the box. It works well for getting a store online quickly, but every business has different goals, branding, and customer expectations.
Customizing the checkout page helps you modify the purchasing experience for your audience while removing unnecessary obstacles. Overall, a custom WooCommerce checkout page directly tackles these pain points:
- Higher Conversion Rates: Removing unnecessary form fields, such as asking for a company name or a second address line, simplifies the purchasing path.
- Stronger Brand Continuity: Aligning the checkout design with your store’s colors, typography, and visual hierarchy reassures buyers that their payment is being processed by a legitimate, professional business.
- Improved Mobile Usability: Over half of all e-commerce transactions occur on mobile devices. Customizing your layout allows you to arrange elements vertically, enlarge tap targets, and reduce scrolling effort on smaller screens.
- Targeted Data Collection: Depending on your business model, you may need specific order details, such as delivery instructions, gift notes, or tax identification numbers. Custom fields let you gather relevant data without cluttering the main form.
- Building Trust at the Decision Point: Strategic placement of trust badges, accepted payment icons, satisfaction guarantees, or concise customer testimonials directly alongside payment gateways helps alleviate buyer hesitation.
Even small improvements can make a noticeable difference. For example, shortening a checkout form by removing unnecessary fields often reduces the effort required to complete an order. Likewise, improving spacing and typography can make the page easier to scan, especially on mobile devices.
What Elements Can You Customize in Your Checkout Page?
Many store owners assume they’re limited to changing colors or fonts. In reality, WooCommerce allows much more flexibility when paired with the right no-code tools.
Depending on your setup, you can customize both the appearance and functionality of your checkout page.
Layout and Page Structure
The overall layout determines how information is presented to customers.
You can customize elements such as: Billing information section, shipping information, order summary placement, coupon area, payment methods, additional notes section, and checkout button placement.
For example, some stores prefer displaying the order summary in a sticky sidebar on desktop, while others place it beneath the billing form for a more linear checkout experience.
Checkout Fields
The checkout form is one of the most commonly customized areas.
You can often remove unnecessary fields, change field labels, rearrange field order, mark fields as optional or required, and add custom fields when needed.
For instance, a digital product store may not need shipping-related information, while a local delivery business might require delivery instructions.
The objective isn’t to collect more information. It’s to collect only the information necessary to fulfill an order.
Visual Design
Appearance plays an important role in usability.
Common design customizations include typography, button styles, colors, borders, backgrounds, section spacing, and form field styles
A visually consistent checkout page reassures customers that they’re still shopping on the same website, building trust throughout the purchasing process.
Mobile Experience
More customers now shop using smartphones than ever before. A checkout that looks great on desktop but feels cramped on mobile can negatively affect conversions.
Mobile optimization often involves improving spacing between fields, enlarging tap targets, simplifying layouts, reducing unnecessary scrolling, and making payment buttons easier to access.
Always preview your checkout on multiple screen sizes before publishing changes.
Different Ways to Customize WooCommerce Checkout Page Without Coding
There are three primary ways to edit a WooCommerce checkout design without editing your theme’s functions.php or style.css files. The right choice depends on how extensively you want to alter the layout.
1. Built-In WooCommerce Settings
WooCommerce includes native controls inside the WordPress Customizer and Gutenberg Block Editor. You can configure basic options such as forcing secure checkout, selecting privacy policy pages, adjusting required field settings, or switching to the native WooCommerce Checkout Block. While convenient, native settings offer limited layout and design flexibility.
2. Visual Page Builders and Dedicated Block Extensions
Using popular drag-and-drop page builders (such as Elementor, Beaver Builder, or Divi) alongside WooCommerce block plugins gives you complete structural freedom. You can build a custom template from scratch, drop dedicated checkout modules (billing form, payment methods, order summary) anywhere on the canvas, and adjust styling visually.
3. Checkout Field Editor Plugins
If your design layout is acceptable and you only need to manage the input forms, a dedicated checkout field manager plugin is the most direct approach. These plugins add a simple backend interface where you can drag to reorder fields, hide default fields, or create custom inputs without altering the surrounding page layout.
Before You Start Customizing WooCommerce Checkout Page
Before making any changes to your checkout page, take a few precautions. Checkout is one of the most critical parts of your online store, and even a minor issue can prevent customers from placing orders.
A little preparation helps you avoid unexpected problems.
✔ Create a Website Backup:
Always create a full backup before editing your WooCommerce store. This ensures you can quickly restore your site if something doesn’t work as expected.
✔ Test Changes on a Staging Site:
Whenever possible, use a staging environment instead of editing your live store.
A staging site allows you to: Test layouts safely, check payment gateways, review mobile responsiveness, and identify plugin conflicts.
Once you’re satisfied with the results, you can publish the changes to your live website.
✔ Update WordPress and WooCommerce:
Running outdated software increases the risk of compatibility issues.
Before customizing your checkout page, verify that WordPress is updated, WooCommerce is updated, your theme supports the latest WooCommerce version, and installed plugins are compatible with one another.
Keeping everything current helps ensure a smoother editing experience.
✔ Review Existing Checkout Performance:
Before making changes, establish a baseline so you can measure improvements later.
Consider reviewing metrics such as cart abandonment rate, checkout completion rate, mobile conversion rate, average checkout time, and customer feedback
Knowing where users struggle makes it easier to prioritize the changes that will have the biggest impact.
How to Customize WooCommerce Checkout Page without Coding (Step-by-Step Process)
Now that your store is prepared, it’s time to customize the checkout page.
Rather than making every possible change at once, work through the process incrementally. Test each adjustment before moving on to the next. This approach makes troubleshooting much easier if something doesn’t behave as expected.
Step 1: Choose a No-code WooCommerce Customization Plugin
Start by selecting a WordPress tool that supports visual WooCommerce checkout customization. Many page builders and WooCommerce extensions offer drag-and-drop editing or checkout template customization without requiring PHP or CSS knowledge.
When evaluating a tool, consider whether it:
- Supports your current WooCommerce version
- Works well with your active theme
- Allows visual editing of checkout layouts
- Let’s you preview changes before publishing
- Is regularly updated and documented
Considering all of these factors, we are using ShopEngine to customize the WooCommerce checkout page.
It is the complete WooCommerce solution for WordPress to build, customize, and optimize your online store, including shop page, checkout page, and shopping cart, with 70+ widgets, 40+ templates, and 20+ advanced modules.
Now go to Plugins → Add New, then install and activate your chosen tool from the WordPress dashboard, then verify that it integrates correctly with your existing WooCommerce setup.
Make sure to install the WooCommerce plugin on your site if you don’t already have it on your site.
Step 2: Enable the Checkout Elements (Widgets)
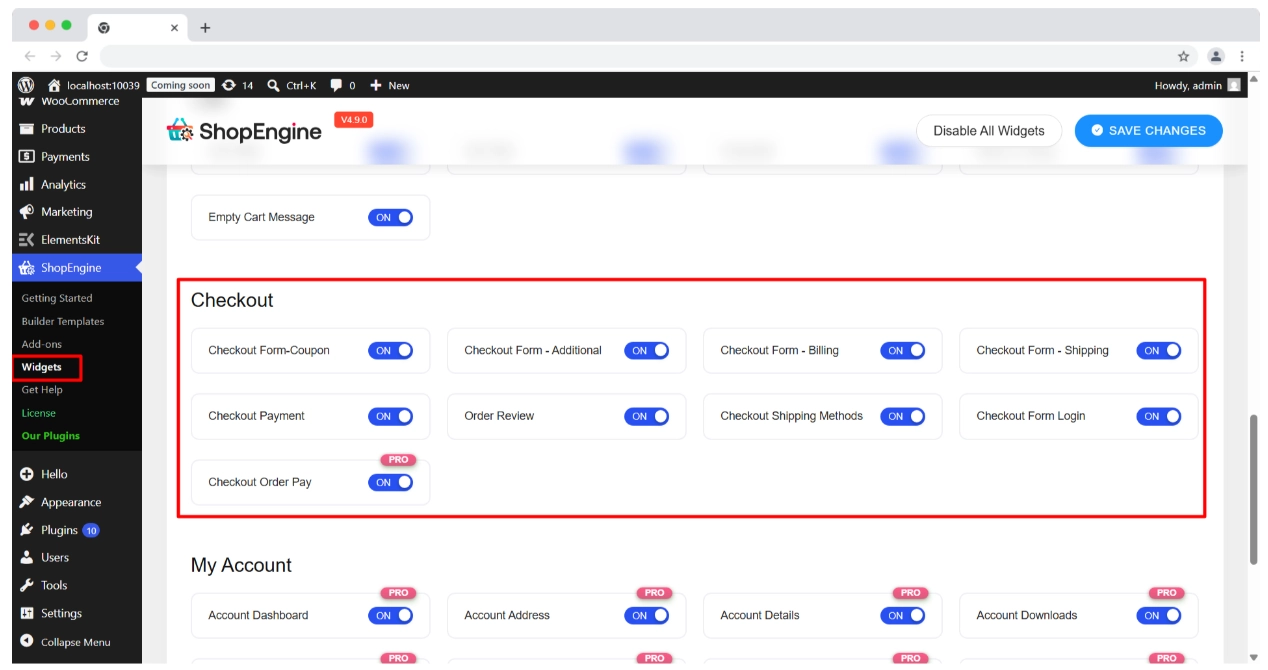
From ShopEngine → Widgets, you can enable the widget elements for the WooCommerce checkout page. These elements will help you add advanced features to your checkout templates.
Step 2: Create a Custom Checkout Page Template
Instead of making changes in the existing page directly, you can create a dedicated template for a customized WooCommerce checkout page.
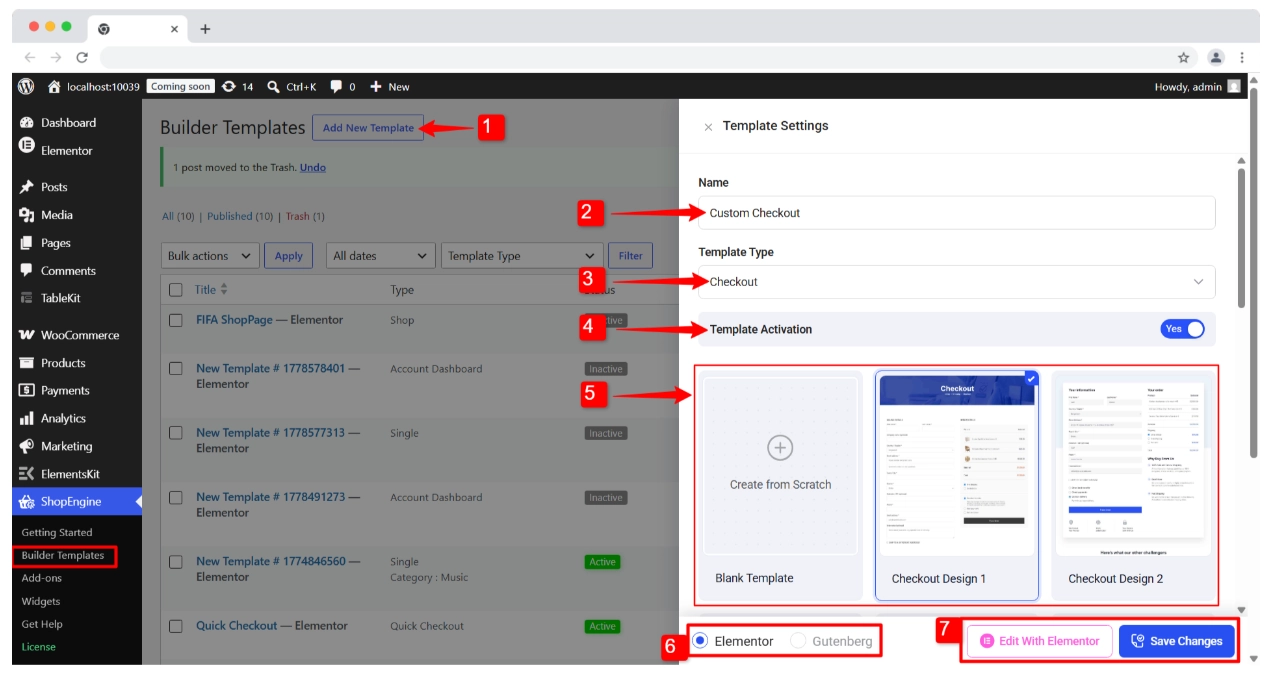
Here are the steps to create a custom checkout template with ShopEngine:
- Go to ShopEngine → Add New Template from your WordPress dashboard.
- A modal will appear, where you can configure the template settings. Start by entering the Name of the template.
- Set the Template Type to “Checkout”.
- Enable the “Template Activation” to make this the default template for the checkout page.
- Pick a pre-designed template from the available list. Or, if you want to start from scratch, select “Blank Template”.
- Then choose between Elementor or Gutenberg as the editor. If you choose Elementor, make sure to install the Elementor plugin.
- Finally, you can simply save changes and move forward, or click on the Edit with Elementor to start customizing it immediately.
For this tutorial guide, you will start with the blank template to walk you through the entire process.
Step 3: Add and Arrange Checkout Modules
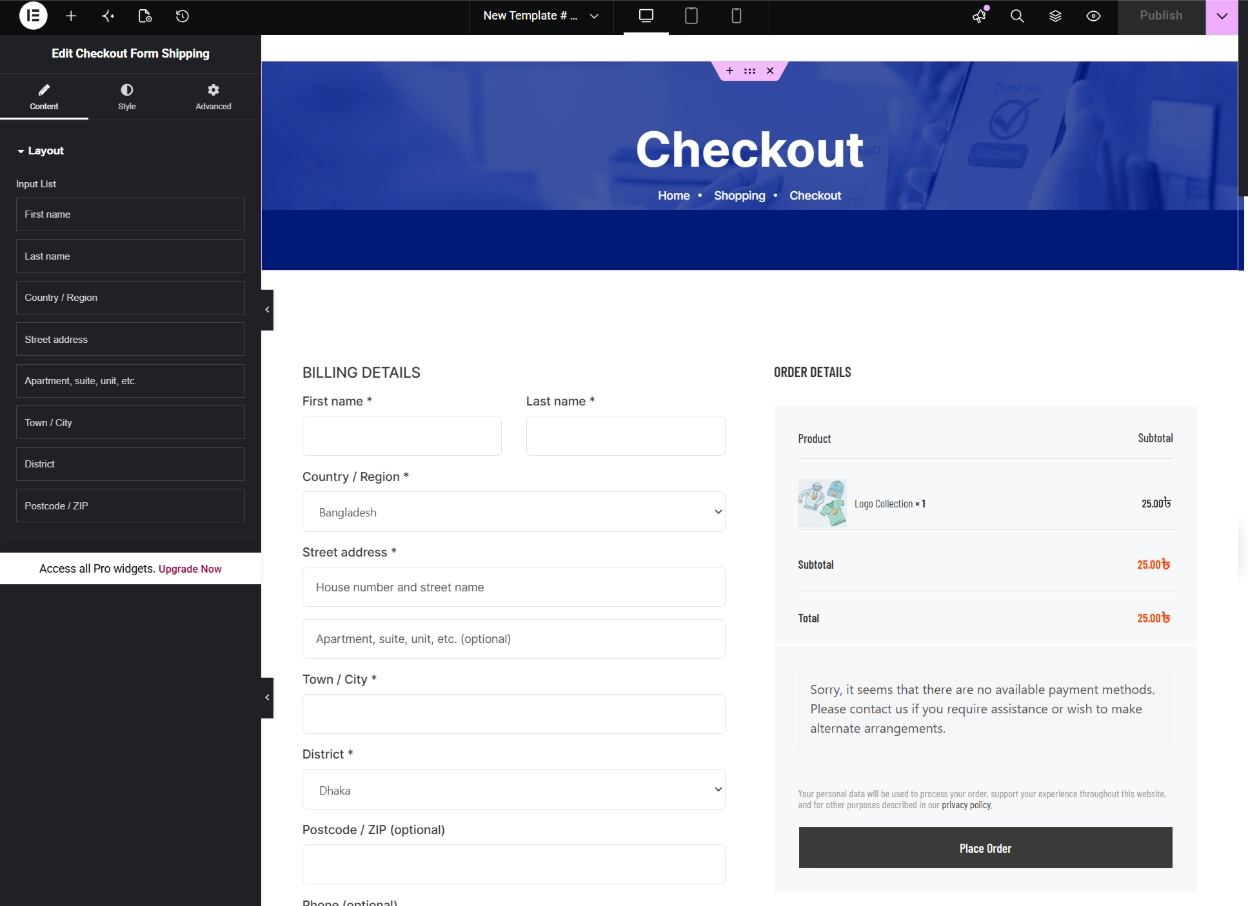
Once inside the visual editor, you will see individual WooCommerce widgets or blocks corresponding to different checkout sections.
- Set Up the Columns: Insert a two-column section (a 60/40 or 65/35 ratio works best for desktop viewports).
- Left Column (Customer Details):
- Drag the Billing Form widget into the left column.
- Drag the Shipping Form widget directly underneath billing.
- Drag the Additional Information / Order Notes block below shipping.
- Right Column (Order Summary & Payment):
- Place the Order Review / Order Summary widget at the top of the right column.
- Add the Coupon Form widget inside or directly above the order summary.
- Drag the Payment Gateways widget beneath the order summary.
- Finally, add the Place Order button.
Step 4: Customize Typography, Colors, and Button Design
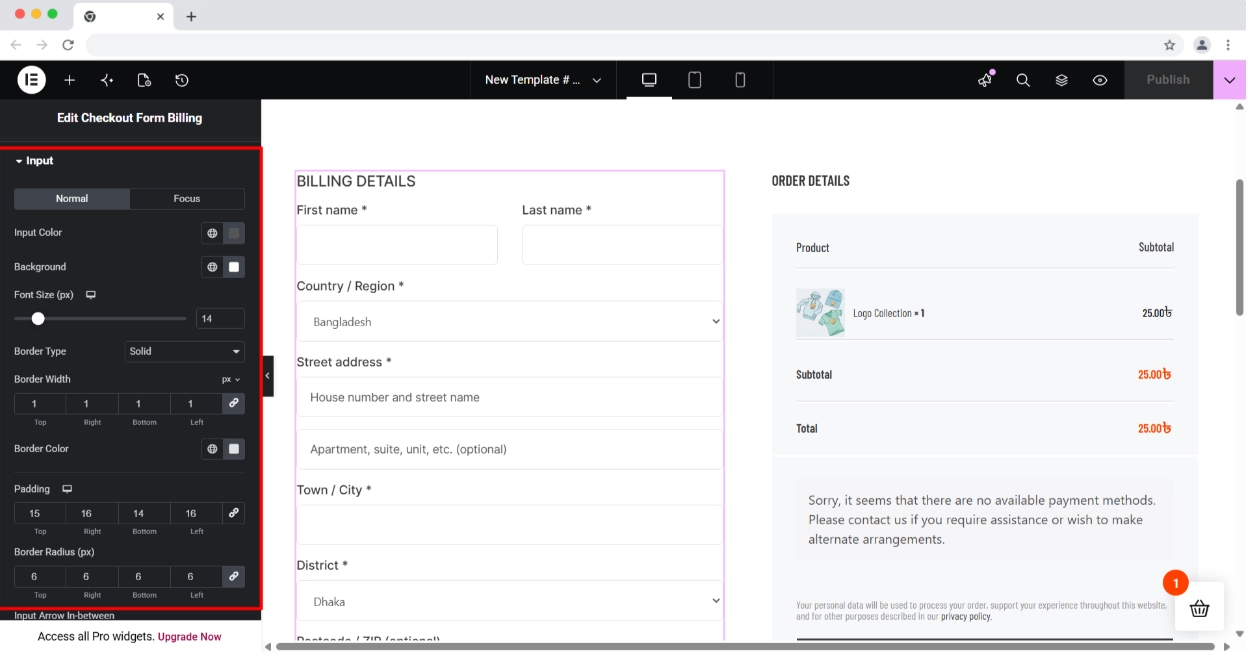
With the layout structure in place, adjust styling to match your store’s design language.
- Input Fields: Set border width, background fill (white or subtle gray), focus outline colors, and field border radii (e.g., 4px–6px for modern rounded edges).
- Headings & Body Text: Apply your site’s primary font family to section headers (“Billing Details”, “Your Order”) and adjust label font sizes so they remain easy to read.
- Primary Action Button: Make the Place Order button prominent. Choose a high-contrast accent color that stands out from the rest of the page, increase font size (16px–18px), and adjust padding so the button provides a large, accessible tap area.
Step 5: Modify and Clean Up Checkout Fields
Simplify the input requirements to make completion fast and effortless.
- Access your field editor controls or module field settings.
- Disable optional or redundant inputs (such as Company Name or Address Line 2) if your customer base rarely uses them.
- Mark essential fields (such as Email Address and Phone Number) as required for order tracking and notification purposes.
- Update field placeholders and labels to clear, actionable instructions (e.g., “Enter your street address” instead of “Address”).
Step 6: Preview and Complete Test Purchases
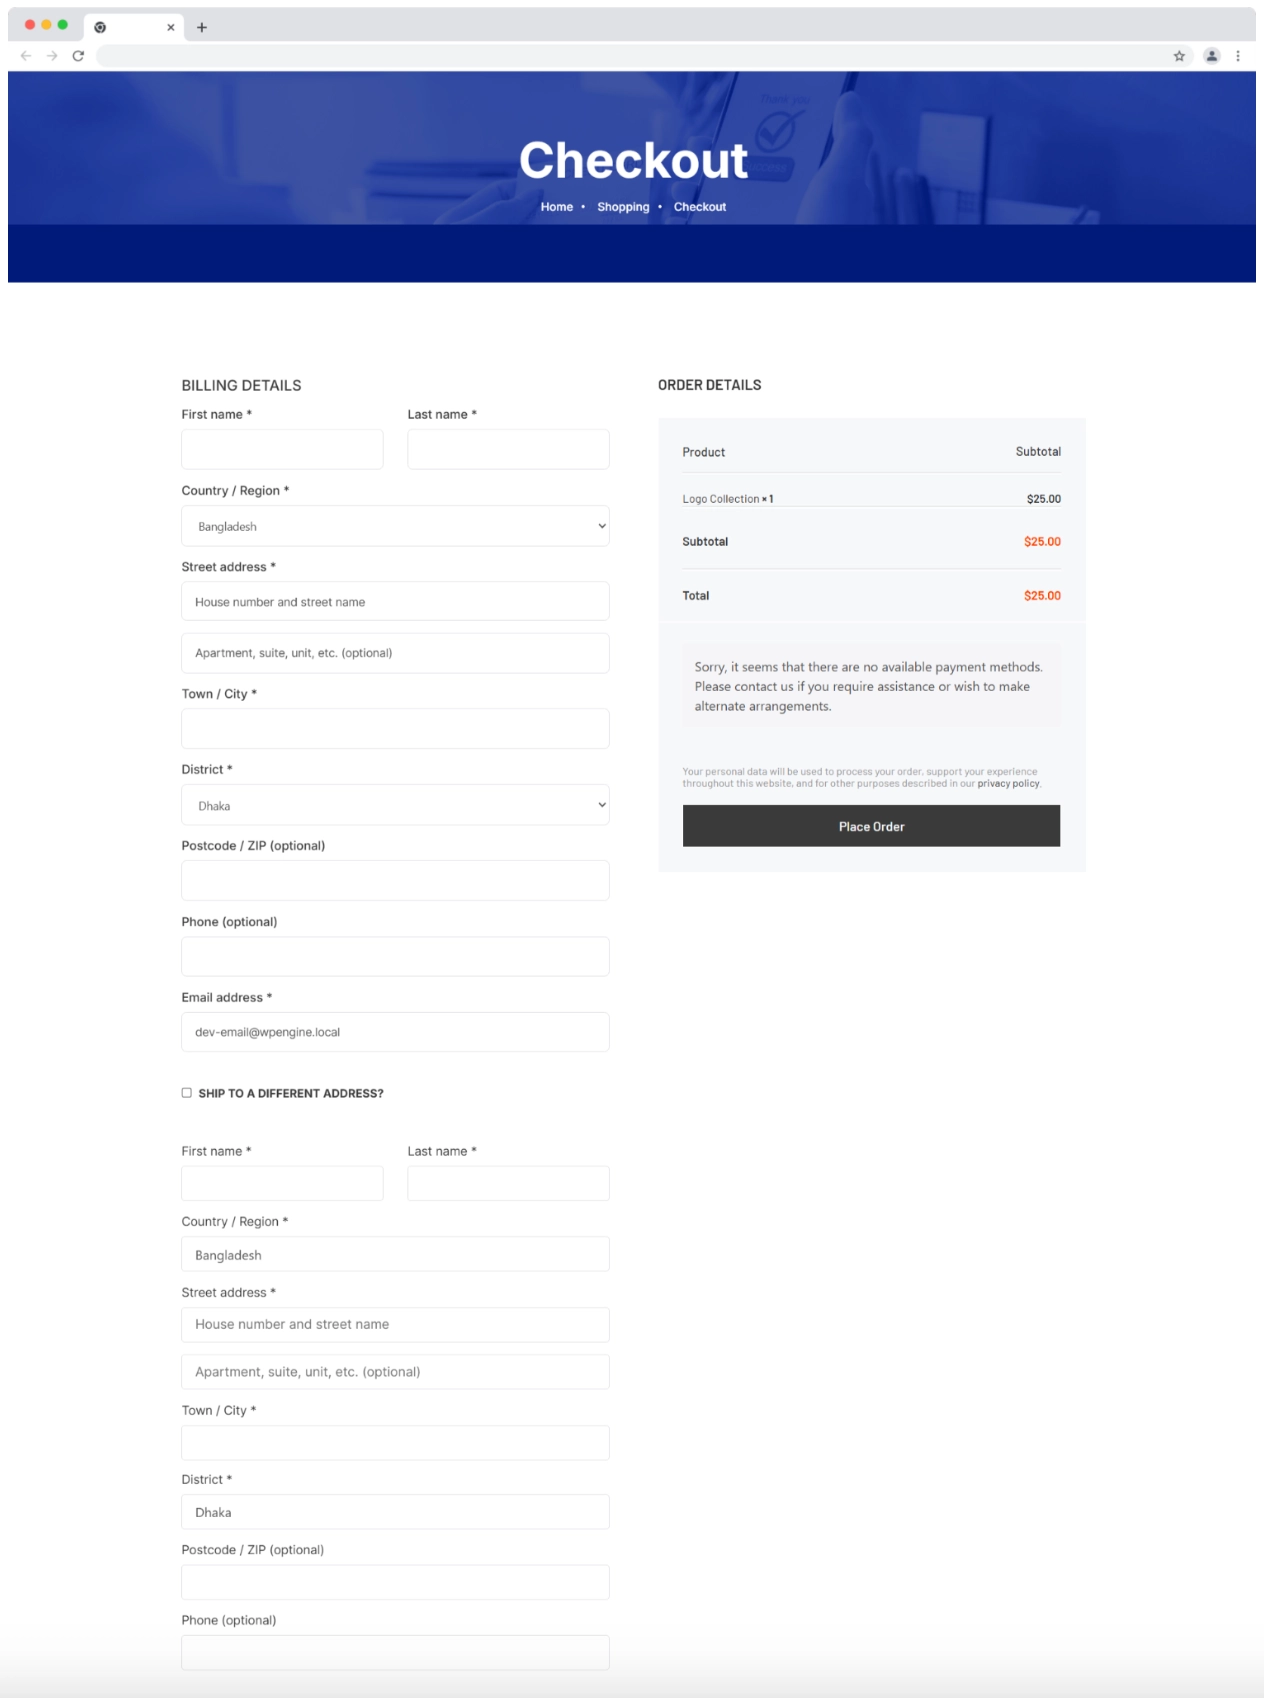
Before publishing your template, perform thorough end-to-end functionality checks:
- Click Preview to view the live rendering in a separate window.
- Place a live test order using test payment credentials or WooCommerce sandbox modes.
- Verify that order data populates correctly in WooCommerce > Orders within the WordPress dashboard.
- Once verified, click Publish.
Best Practices for a High-Converting Checkout Page
Visual flexibility is valuable, but design decisions should always serve user clarity and conversion rates. Follow these proven recommendations when shaping your checkout:
- Maintain a Distraction-Free Layout: Remove standard store headers, main navigation menus, sidebar widgets, and footer link lists from the checkout page. Eliminating unnecessary links reduces exit points and helps buyers stay focused on completing their transaction.
- Implement Smart Field Logic: If you sell digital products, downloads, or virtual services, configure your store to hide shipping address fields automatically. Requesting physical address details for digital delivery adds friction and lowers purchase completion rates.
- Display Trust Signals and Payment Icons: Place security badges, SSL certificates, accepted credit card logos, and concise privacy notes near the payment gateway section. Reassuring users that their sensitive data is safely processed reduces last-minute hesitation.
- Keep Order Summaries Visible: Ensure buyers can review cart contents, applied discounts, taxes, and shipping fees without navigating away from the page. Clear cost breakdowns prevent unexpected price additions, which are a leading cause of abandoned carts.
- Simplify Coupon Code Fields: Collapse the coupon code input field under a toggle link (e.g., “Have a promo code?”) rather than displaying an open text box prominently. Prominent coupon boxes often prompt users to leave checkout to search for discount codes elsewhere online.
Conclusion
Customizing your WooCommerce checkout page does not require advanced programming skills or costly custom development. Visual site builders, block tools, and field editors give store owners complete control over the structure, visual appearance, and user experience of their checkout funnel.
Focus on creating an effortless path to purchase: eliminate unneeded form fields, keep branding consistent, display clear trust signals, and optimize layout responsiveness for mobile shoppers. By turning a generic checkout form into an intuitive, frictionless experience, you turn more store visitors into happy, paying customers.